Applying Clean Architecture in Go
May 27, 2021 - Geison BiazusOne of the problems I frequently see on many software projects is the coupling of the code and how hard it is to make simple changes without undesired side effects. This happens mainly because developers tend to focus on building the features without thinking about how the codebase will evolve in the future, and also without taking into consideration that the libraries and frameworks they are using today might not be the best option in some months or years.
At the beginning of a project, there are a lot of decisions that need to be made. And what many engineers do is look at the scope of the project and decide on which tools they will use to build it. Those tools are programming languages, frameworks, databases, external APIs, deployment, among others. By taking such decisions early on, they lock into these tools and couple the entire code base, making it hard to change and maintain.
Most of those tools are mere details and except for the programming language, all other decisions can be delayed for some time until the project gets more mature. Instead of deciding in which tools the project will be made, the effort, early in the project, should be on how the domain model will look like, and treat those tools as what they are, details. Of course, that to deliver the project, the details have to be chosen, but they can stay in a part of the code, separated from the domain, where they can be easily changed, removed, or replaced whenever we want.
It is exactly to solve this problem of coupling that highly experienced engineers created some architectural patterns such as the Clean Architecture from Robert "Uncle Bob" Martin, the Hexagonal Architecture from Alistair Cockburn, and the Explicit Architecture from Herberto Graça.
In this post, I show how I built this Blog using concepts from these patterns. I followed mainly the Clean Architecture but I also used some concepts and naming conventions from the other patterns. It is implemented using the Go programming language, but these ideas can be applied to any language.
Layers
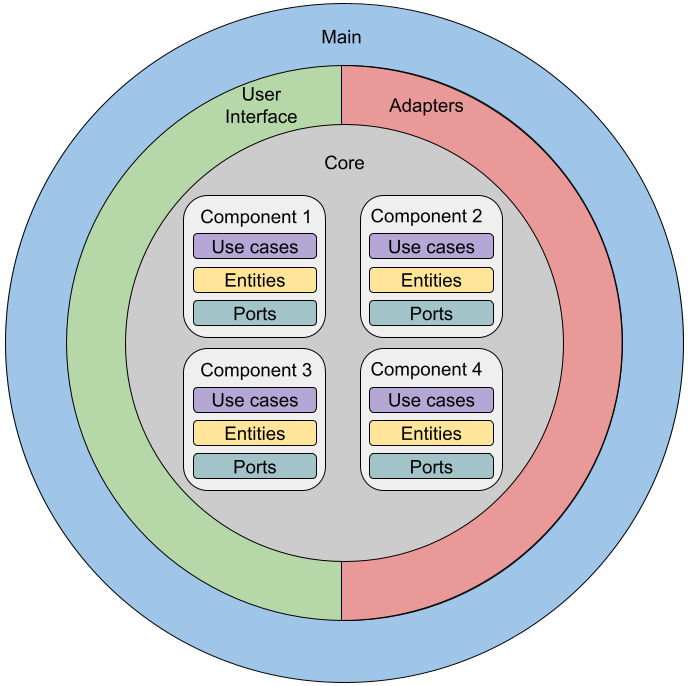
There are four main kinds of layers: Core, Adapters, User Interface, and Main. You can see the explanation for each one below.
Core
This is the core of the application and it holds only pure business rules. All of its components have no external dependencies. All tests pass without starting any web server or having started a database server.
The core layer is divided into core components. These components separate the application into independent developable parts. This project has only one core component called blog. Other examples of core components could be comment, authentication, or authorization.
Inside of each core component, there are 3 kinds of elements:
- Use cases - These objects implement every action that the system does. They can be triggered by a user, by a scheduled job, or by a reaction to an event. They only hold high-level policy and their objective is to orchestrate the other kinds of elements.
- Entities - The purest objects and business rules. They can be simple data structures or more complex objects, but they don't know anything about persistence or delivery mechanism. These objects can be shared between other layers of the application.
- Ports - These are just interfaces and they are used by the use cases. Anything that would couple the code to a database or an external library is a port in the core.
A common behavior found in the core is that a use case is called by another layer receiving some data, then it loads some entity from the persistence using a port. After that, it manipulates the entity generating its new state. It can use other ports or entities in this process. In the end, the use case persists the entity again using a port and returns the expected result.
Adapters
Each adapter implements a port interface used by the core. Any external dependency, that being a library, a framework, an external API, or a database, goes to an adapter. The adapter is the low-level detail that the high-level policy (use case) manipulates. This structure allows us to have multiple adapters for the same port, it also allows us to extend the behavior of the adapter by using design patterns like Composite or Decorator.
User interface
The UI layer is where the interaction of the user goes. Inside of this layer, you can have multiple delivery mechanisms like Website (HTML), REST API, GraphQL, gRPC, CLI, each one being a different component inside of the UI layer.
Main (app)
The "Main" layer is where all the wiring goes. This layer knows everything about the other layers and knows how to initialize all components with the correct dependencies. Due to the main package being a reserved package name in Go, this layer was called app in the blog implementation.
The Blog project
The way the Blog project works is the following: Posts are written in the Markdown format and are stored as text files in the /posts directory. Whenever a request for a specific post comes through the web server, the post file is loaded and parsed, the Markdown content is converted to HTML, then the result is returned to the user.
The post file has the following format:
title: Post title
author: Author name
description: Post description
image_path: /static/image/sample-image.jpg
time: 2021-04-21 22:37
--
## Markdown Content
Implementation
The project has been implemented using Test Driven Development but the tests as well as some parts of the code are omitted from this post for simplicity. You can find the full source code on the blog repository on GitHub.
In this post, I show you the implementation of the View Post use case through all the layers. Other use cases follow a similar structure and the code can be seen in the GitHub repository.
Folder structure
The project follows a standard folder structure from the Go community. This structure can be found in the project layout repository on GitHub.
The current folders are:
- cmd - Contains the main file for the delivery mechanism (web).
- deployment - Deployment scripts.
- internal - The most important folder, contains the implementation of all the layers and components.
- pkg - Project independent packages with the intention of" extending" the language. Each one of these packages could be released as a standalone library.
- posts - Specific for this project. This is where the written posts using markdown are stored.
- test - Contains integration tests and other test assets.
- web - Web-related stuff like templates and static files.
Core
Whenever I start implementing any feature, I always start with a use case. The use cases go in the core layer inside of the components they belong. As this application is small enough there is only one component called blog.
The use case always implements the high-level policy of the feature leaving the low-level details for the adapters plugged in the ports. Every use case has the format of a struct (class) with a Run method. The struct holds the dependencies while the request arguments are passed directly in the Run method. Here is the implementation of the blog.ViewPostUseCase:
// internal/blog/view_post_use_case.go

package blog

type ViewPostUseCase struct {
  postRepo PostRepo
  renderer Renderer
}

func NewViewPostUseCase(postRepo PostRepo, renderer Renderer) *ViewPostUseCase {
  return &ViewPostUseCase{postRepo: postRepo, renderer: renderer}
}

func (u *ViewPostUseCase) Run(path string) (RenderedPost, error) {
  post, err := u.postRepo.GetPostByPath(path)

  if err != nil {
    return RenderedPost{}, err
  }

  return u.renderPost(post)
}

func (u *ViewPostUseCase) renderPost(post Post) (RenderedPost, error) {
  renderedContent, err := u.renderer.Render(post.Markdown)

  if err != nil {
    return RenderedPost{}, err
  }

  return RenderedPost{
    Post: post,
    HTML: renderedContent,
  }, nil
}
The Run method receives a post path as an argument. With this path, it loads the Post (entity) from the PostRepo (port). If the post is found it renders the post Markdown using the Renderer (port). Finally, it builds and returns a RenderedPost(entity).
Post is a simple data structure containing the post data returned by the PostRepo while RenderedPost is another data structure built inside the use case containing the original Post and the rendered HTML to be returned to the UI.
The ports PostRepo and Renderer are interfaces where adapters can be plugged in to build the full use case flow.
Here is how the ports and entities are implemented:
// internal/blog/entities.go

package blog

import "time"

type Post struct {
  Title       string
  Author      string
  Time        time.Time
  Path        string
  Description string
  ImagePath   string
  Markdown    string
}

type RenderedPost struct {
  Post Post
  HTML string
}
// internal/blog/ports.go

package blog

import "errors"

type PostRepo interface {
  GetPostByPath(path string) (Post, error)
}

var ErrPostNotFound = errors.New("post not found")

type Renderer interface {
  Render(content string) (string, error)
}
Adapters
Adapters are the low-level details controlled by the use cases. They are stored in the following directory structure: internal/adapters/PORT/ADAPTER_TYPE where PORT is the name of the port it implements and ADAPTER_TYPE is the type of adapter for that port. In this case, we have a FileSystem adapter for the PostRepo port and a Goldmark adapter for the Renderer port, the last being named after the name Markdown library it "adapts".
Starting with the PostRepo, the implementation is the following:
// internal/adapters/postrepo/filesystem/post_repo.go

package filesystem

import (
  "io/ioutil"
  "path/filepath"

  "github.com/geisonbiazus/blog/internal/core/blog"
)

type PostRepo struct {
  BasePath string
}

func NewPostRepo(basePath string) *PostRepo {
  return &PostRepo{BasePath: basePath}
}

func (r *PostRepo) GetPostByPath(path string) (blog.Post, error) {
  content, err := ioutil.ReadFile(filepath.Join(r.BasePath, path+".md"))

  if err != nil {
    return blog.Post{}, blog.ErrPostNotFound
  }

  post, err := ParseFileContent(string(content))
  post.Path = path

  return post, err
}
The filesystem.PostRepo implements the blog.PostRepo interface. The GetPostByPath receives a path, which is the post identifier in the system, reads the file based on the base path given in the repository constructor, and then parses the file content using the ParseFileContent function generating a blog.Post entity.
The ParseFileContent function implementation is omitted from this post for simplicity. You can check its implementation as well as its tests on GitHub.
The second adapter used by the ViewPostUseCase is the Renderer and you can see the implementation next:
// internal/adapters/renderer/goldmark/renderer.go

package goldmark

import (
  "bytes"

  "github.com/alecthomas/chroma/formatters/html"
  "github.com/yuin/goldmark"
  highlighting "github.com/yuin/goldmark-highlighting"
)

type Renderer struct{}

func NewRenderer() *Renderer {
  return &Renderer{}
}

func (r *Renderer) Render(content string) (string, error) {
  var buf bytes.Buffer

  markdown := goldmark.New(
    goldmark.WithExtensions(
      highlighting.NewHighlighting(
        highlighting.WithStyle("monokai"),
        highlighting.WithFormatOptions(
          html.TabWidth(2),
        ),
      ),
    ),
  )

  err := markdown.Convert([]byte(content), &buf)

  if err != nil {
    return "", err
  }

  return buf.String(), nil
}
Similar to the post repository, the goldmark.Renderer struct implements the blog.Renderer interface. It abstracts away from the use case of how the markdown is converted to HTML. The goldmark library is used for that.
Note that this file is the only place that the goldmark library is used or mentioned. This makes extending the behavior or replacing the library simpler when evolving the project. This is the great benefit of the adapters.
User interface
The blog project uses HTTP and HTML as its delivery mechanism. For this, I chose the name web as the name of this "website" component. Everything web-related like a server, router, and handlers (also known as controllers in other languages or frameworks) goes to this package.
Starting with the handler, each handler calls a use case from the core layer to get its result. For better testability, each use case is represented as a port inside of the web package similar to the adapters in the core package. Here, the use case implementation is the "adapter" of this port in the UI layer. The use case port is defined as follows:
// internal/ui/web/ports.go

package web

import "github.com/geisonbiazus/blog/internal/core/blog"

type ViewPostUseCase interface {
  Run(path string) (blog.RenderedPost, error)
}
In other languages such as Java or C# where you need to explicitly mention the implemented interface, this port would be defined inside of the core layer to avoid it from knowing the outer layers creating cyclic dependencies. But as Go interfaces are implicitly implemented, it is possible to keep this interface closer to where it is used without introducing coupling.
With the use case port in place, the handler implementation is done as follows:
// internal/ui/web/view_post_handler.go

package web

import (
  "fmt"
  "html/template"
  "net/http"
  "path"

  "github.com/geisonbiazus/blog/internal/core/blog"
)

type ViewPostHandler struct {
  usecase  ViewPostUseCase
  template *TemplateRenderer
}

func NewViewPostHandler(
  usecase ViewPostUseCase, templateRenderer *TemplateRenderer,
) *ViewPostHandler {
  return &ViewPostHandler{
    usecase:  usecase,
    template: templateRenderer,
  }
}

func (h *ViewPostHandler) ServeHTTP(
  res http.ResponseWriter, req *http.Request,
) {
  path := path.Base(req.URL.Path)
  renderedPost, err := h.usecase.Run(path)

  switch err {
  case nil:
    res.WriteHeader(http.StatusOK)
    h.template.Render(res, "view_post.html", h.toViewModel(renderedPost))
  case blog.ErrPostNotFound:
    res.WriteHeader(http.StatusNotFound)
    h.template.Render(res, "404.html", nil)
  default:
    res.WriteHeader(http.StatusInternalServerError)
    h.template.Render(res, "500.html", nil)
  }
}

func (h *ViewPostHandler) toViewModel(p blog.RenderedPost) postViewModel {
  return postViewModel{
    Title:       p.Post.Title,
    Author:      p.Post.Author,
    Description: p.Post.Description,
    ImagePath:   p.Post.ImagePath,
    Path:        fmt.Sprintf("/posts/%s", p.Post.Path),
    Date:        p.Post.Time.Format(DateFormat),
    Content:     template.HTML(p.HTML),
  }
}

type postViewModel struct {
  Title       string
  Author      string
  Date        string
  Description string
  ImagePath   string
  Path        string
  Content     template.HTML
}
The web.ViewPostHandler struct implements the Go internal http.Handler interface which is the standard to handle HTTP requests using the standard library. The ServeHTTP method extracts the post path from the request and then runs the use case getting a blog.RenderedPost and a possible error result. Based on the error result it sets the appropriate status code and renders a template using the web.TemplateRenderer module.
In case of success, a postViewModel is generated. This view model contains all the information of the post properly formatted and ready to be displayed in the UI. The view model then is passed to the template renderer which will simply generate the final HTML and display it to the user.
The template renderer, the router, and the server are also part of the web package but their implementation is omitted from this post. You can check their code on GitHub.
App
Having all these layers and components implemented, what is missing is just to put all the pieces together. The goal of the app layer is to provide this wiring. This component knows every other component and understands which dependency goes to each component. Here is the implementation:
// internal/app/context.go

package app

import (
  "log"
  "net/http"
  "os"
  "path/filepath"

  "github.com/geisonbiazus/blog/internal/adapters/postrepo/filesystem"
  "github.com/geisonbiazus/blog/internal/adapters/renderer/goldmark"
  "github.com/geisonbiazus/blog/internal/core/blog"
  "github.com/geisonbiazus/blog/internal/ui/web"
  "github.com/geisonbiazus/blog/pkg/env"
)

type Context struct {
  Port         int
  TemplatePath string
  StaticPath   string
  PostPath     string
  BaseURL      string
}

func NewContext() *Context {
  return &Context{
    Port:         env.GetInt("PORT", 3000),
    TemplatePath: env.GetString("TEMPLATE_PATH", filepath.Join("web", "template")),
    StaticPath:   env.GetString("STATIC_PATH", filepath.Join("web", "static")),
    PostPath:     env.GetString("POST_PATH", filepath.Join("posts")),
    BaseURL:      env.GetString("BASE_URL", "http://localhost:3000"),
  }
}

func (c *Context) WebServer() *web.Server {
  return web.NewServer(c.Port, c.Router(), c.Logger())
}

func (c *Context) Router() http.Handler {
  return web.NewRouter(c.TemplatePath, c.StaticPath, c.UseCases(), c.BaseURL)
}

func (c *Context) UseCases() *web.UseCases {
  return &web.UseCases{
    ViewPost:  c.ViewPostUseCase(),
  }
}

func (c *Context) ViewPostUseCase() *blog.ViewPostUseCase {
  return blog.NewViewPostUseCase(c.PostRepo(), c.Renderer())
}

func (c *Context) PostRepo() *filesystem.PostRepo {
  return filesystem.NewPostRepo(c.PostPath)
}

func (c *Context) Renderer() *goldmark.Renderer {
  return goldmark.NewRenderer()
}

func (c *Context) Logger() *log.Logger {
  return log.New(os.Stdout, "web: ", log.Ldate|log.Ltime|log.LUTC)
}
The app.Context module acts like a Dependency Injection container. When asked for the webserver, for example, it knows how to build all the dependencies from every layer for it to work. The same applies to any other component in the application.
Main file
The final part is the main file. The implementation is rather simple as it is just an entry point for the app:
// cmd/web/main.go

package main

import (
  "log"

  "github.com/geisonbiazus/blog/internal/app"
)

func main() {
  c := app.NewContext()
  log.Fatal(c.WebServer().Start())
}
The main function just creates an app.Context, gets the web server, and starts it.
Final thoughts
Uncle Bob says that good architecture maximizes the decisions not made. And that's exactly what this is. By having every low-level detail of your application implemented as an adapter, you don't have the pressure of doing the "right" decision from the start, because, in reality, the right decision is always attached to the time of the implementation.
Something that works now, will probably not be the best option in some months or years. Sometimes we take some shortcuts and add some technical debts on purpose to meet deadlines. That's why having a good architecture to keep this under control is a requirement.
The concepts of Clean Architecture make the development and maintainability of the software a lot easier. You don't need to spend much time deciding your infrastructure early on. If anything needs to be changed, as long as the business rules remain the same, it is just a matter of implementing a new adapter. If you need to change a business rule, you do it with minimal changes on the adapters, sometimes no change at all.
This is the greatness of this approach. Things are easy to change, easy to test, and everything has its place on the codebase.